


 01:36
01:36
 kingsands


Root with your own risk
Warning : I will not be held liable for any damage on your device. It may void your warranty.
For kitkat only JB may not work. Before root kindly backup your data.
You need for this rooting method
1. Root z5 kitkat v2
2. Intel driver
3. USB Cable
4. Windows pc
I am using windows 7 for this work.
Root z5 kitkat v2 download link :
http://www.mediafire.com/download/p5...one5KitKat.zip
Alternate links : 1. http://www.mediafire.com/download/wn...e5KitKatv2.zip
2. https://www.asuswebstorage.com/navig...B621E634114C6Y
Intel driver download link:
1. http://www.mediafire.com/download/4m...Setup1.1.5.exe
(Or)
2. http://d-h.st/VfO
Root Kitkat Zenfone 5 ver 2.21.40.44
Download link :
1. http://www76.zippyshare.com/v/tVA4DcDx/file.html
2. http://www.4shared.com/zip/-dmbfJCHc...tv4-by_dan.htm
1. Download first Intel driver on your pc extract it and install it.


2. After installed, connect your phone to your pc using usb cable. Don't forget to enable debugging mode. To do that, go to settings>about>software information>build number (tap 7 times to enable developer option) then, go back to settings>developer options>usb debugging (enable/check it).

3. After update, Test for authorized connection between pc and phone. Go to downloaded rootz5kitkatv2 on your pc and click files>hold shift + right>choose open command window.

4. Then cmd will prompt. Then type " adb devices" hit enter. The left side is your serial number and the right side is the word "device" it means your good to go.

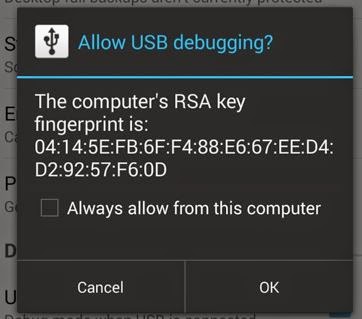
5. If the word "unauthorized" will appear instead of "device" then youre not good to go. So unplugged your phone from pc and reconnect again. A prompt from your phone will appear. Just check allow always to continue.
6. Please read the instructions carefully. These time we will root your phone. Now, stay connected to your pc with your mobile and open the file "rootz5kitkatv2" that you download file. Double click "root-zenfone5-ww" or "Root-ZenFone5-en"
.JPG)
7. The bat file will open and the rooting process is now starting. Your phone will reboot 5 to 6 times. Just press any key to continue. Wait for some more time

last reboot screen ...

8. Last reboot will appear, check your phones app drawer, if you can see SuperSU, congrats! you are now rooted.

9. To survive root access during OTA updates, go to supersu>settings>enable pro. Once done, go back again supersu>settings>enable survival mode.

Congrats !!!

Your Asus Zenfone 5 KITKAT now is rooted.
If you want unroot see supersu "full unroot" or zenfone root toolkit bat file.
Tested By me with my zenfone 5 501CG
This post useful to you Hit thanks button
 Posted in: Android
Related Post:
Widget by [ BMATINDAS ]


0 comments:
Post a Comment